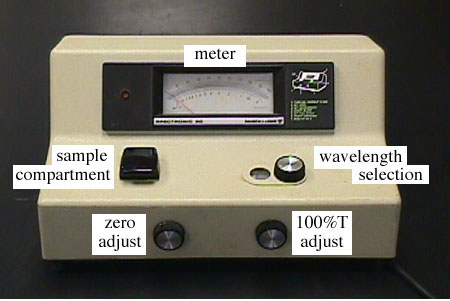
| 1.
| Turn on the SPECTRONIC 20 by turning the power/zero adjust switch clockwise. The spectrometer should be allowed to warm up for at least fifteen minutes to stabilize the source and detector.
|
| 2.
| Set to desired wavelength with the wavelength control knob.
|
| 3.
| Make sure the sample compartment is empty and the cover is closed. Adjust the meter to 0 %T with the zero adjust knob. This adjustment tells the instrument what signal corresponds to all of the light being absorbed.
|
| 4.
| Fill a clean cuvette with your blank solution and clean the outside of the cuvette with a lint-free tissue. Place the cuvette in the sample compartment and align the guide mark on the cell with the guide mark at the front of the sample compartment. Close the lid and adjust the meter to 100 %T with the 100 %T adjust knob. This adjustment tells the instrument what signal corresponds to no light being absorbed. The blank solution should be made with the same solvent as your sample solution in order to account for any absorption by the solvent.
|
| 5.
| Remove the cell from the sample compartment and empty it. Rinse the cell twice with small volumes of the solution to be analyzed and then fill it approximately two thirds full with the same solution. Wipe the outside of the cell with a tissue and insert it into the sample compartment. Align the guide marks and close the lid. Read %T from the meter.
|
| 6.
| Repeat step 5 for any additional samples. When all measurements are completed, turn off the spectrometer by turning the power switch counterclockwise until it clicks.
|
| NOTES:
| To read the meter properly, align the needle with its reflection in the mirror.
|
|
| Steps 3 and 4 must be repeated whenever the wavelength is changed.
|


